I had this little beauty out for a good thrash, reaching the 100 flight milestone on this plane😊 Between the two RC Powers F-22 V5s I have built, I now have 300+ flights, it is my favorite of the RC Powers V5 series of park jets.

Here is some flight video of my current plane shot just awhile ago with the current setup I am still using.
Here is a "table talk" video I did that discusses much of what is below, however as mentioned in the video, you will find more pictures and actual measurements below if you are looking for ideas or inspiration to try your own mods😊
So learning from the first build and some of the DTF builds I have done recently, when I decided to build another, I chose to build the wing plate, fuselage and vertical stabs of DTF. The "engine/nacelles" on the bottom are made of 6 mm Depron (the parts with the black lines and light blue paint in the picture below) The "under rudders" are also made of Depron.

I again downsized the plans by 5%, so my wingspan is now 27"/686 mm and my plane is 36 and 1/4"/921 mm long. I like this size as it fits in well with most of the other planes I have in my "hangar".
Current power setup -
Motor - DYS BE2208 2600 Kv;
Prop - 6x4 APC gas;
ESC - Turnigy Plush 30A;
Battery - 2200 3S 40 or 45C, I have a couple different types I use.
Controls -
Elevons controlled by two RC Timer 9 gr nylon gear servos;
Ailerons and rudders controlled by a total of four RC Timer 5 gr nylon gear servos.
My current AUW with a 2200 3S battery is 20.9 oz/592 gr.
My current throws are as follows, I should mention that I fly with fairly low expo, 15% in the pitch and roll and 20% in the yaw, setting them at "just enough" to allow me to fly how I like to fly with a little extra in the pitch if I need to avoid contact with the ground, tree, fence, me😉 -
Pitch - 3/4" one way;
Roll - Elevon - 5/8" one way, Aileron 1/2" one way; and
Yaw - 1 and 1/2" one way.
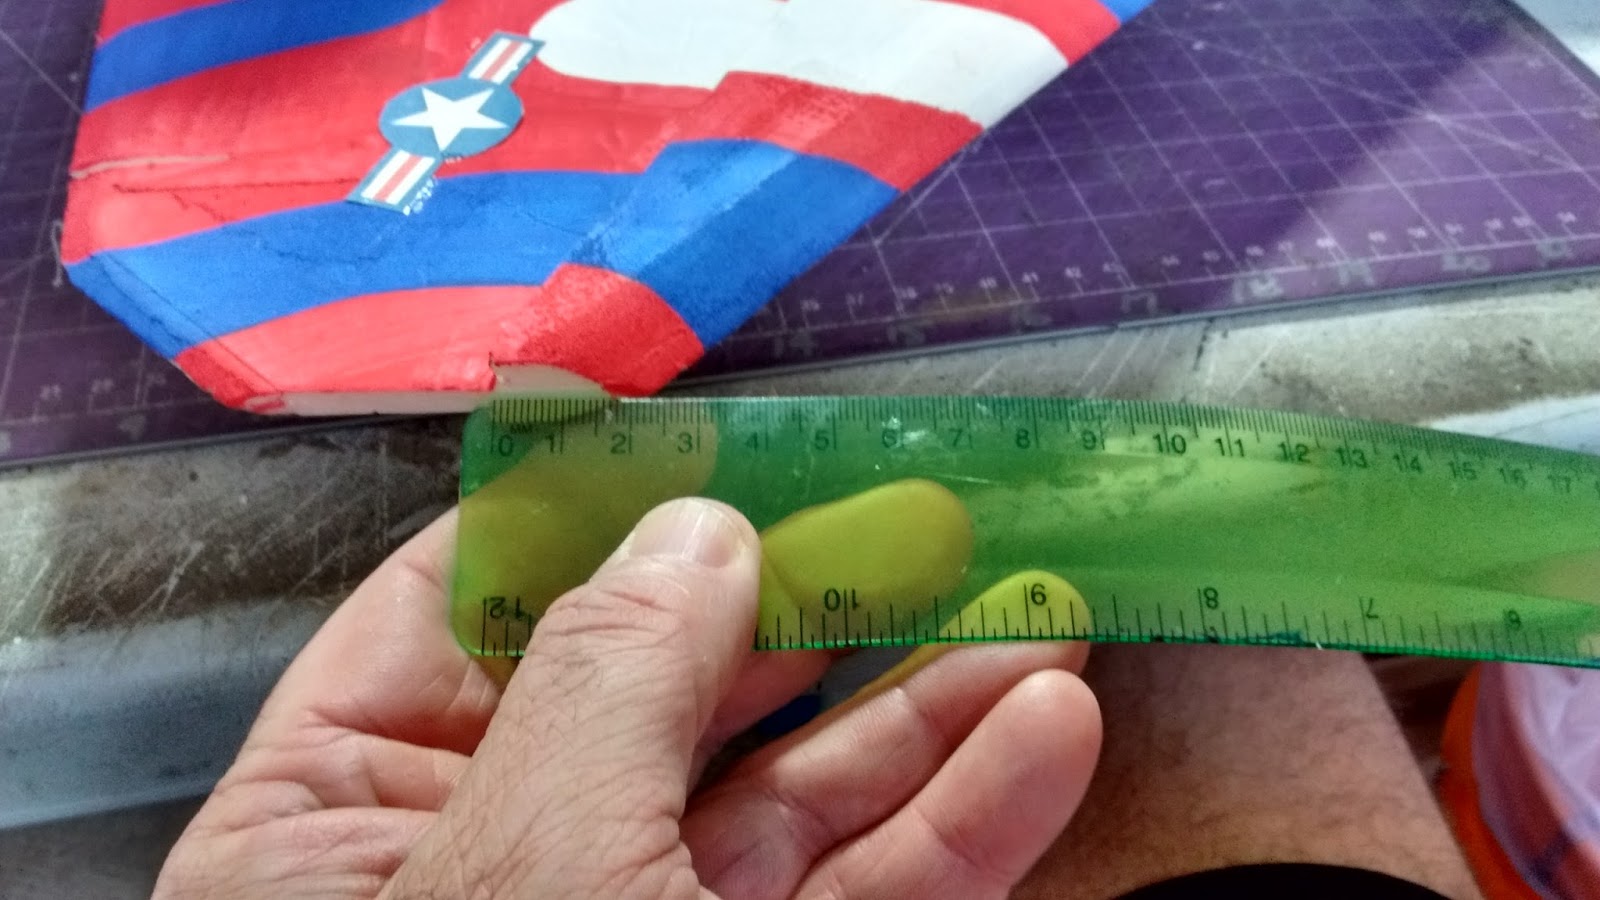
Here is a series of pictures showing where I held the ruler to make these measurements for reference.


Build modifications
I will start at the nose of the plane and work backwards.
As I did with the first F-22 V5 I built, I made several mods not including downsizing it by 5%. Some of the same mods followed into this build with one or two more.
KF airfoils. I resized the KF4 airfoils somewhat, mine are about 40% of wing chord at the wing root measured where the wing meets the fuselage and about 35% of wing chord at the tip. From all the testing done with the NAMC Mig-FA and Mig-35A, this is my favorite setup for the majority of park jets I fly. I did have to do some careful checking since I was moving the motor forward by 1" and adjusting the leading edge of the prop slot to accommodate shorter quad racing motors as you can see in this picture, not a whole lot of room there😊

The measurement of my top KF airfoil along the fuselage where the ruler is showing below is 10 and 5/16"/262 mm.

At the wingtip, the KF measures 7/8"/23 mm.
On the bottom KF, along the side of the "engines", it measures 4 and 7/8"/120.6 mm, same measurement at the wing tip as the top KF.

Ailerons. As mentioned in the video above, I resized my ailerons to suit how I like my planes to handle. I have found that ailerons that span 60% of the trailing edge of the wing gives me the "feel" that I like in my park jets. I put the inside of the aileron where the red line is shown where it was on the plans and lengthened it to 1 and 3/4"/44.5mm. Where the white line is along the trailing edge of the aileron, it measures 5 and 7/8"/149mm (I think I said the wrong number of mm in the video, sorry😞. Where the black line is on the outer edge of the aileron, it measures 1 and 1/8"/28.5 mm

As mentioned in the video, I lowered the battery down as low as I could get it while still keeping good strength in the bottom of the fuselage. Where my battery attaches to the plane is now 1 and 1/4"/31.75 mm below the bottom of the wing plate. I think this is crucial to making this plane as stable as possible without causing any handling issues. It definitely makes it far more stable and "self righting" if I get too slow or get myself into trouble.
The motor is moved forward by 1" and I trimmed about 3/8"/9.5mm off the leading edge of the prop slot after moving the motor forward. This is to help accommodate shorter quad racing motors. This ensures proper clearance between the leading edge of the prop slot and the prop, improving performance and reducing noise.
As mentioned in the video, I "shimmed" the motor so that it angles down to help prevent "zooming" as the plane accelerates to top speed. Hopefully you can see the washer where the tip of the hex driver is pointing. This washer is about 1mm thick. I would still always mount the motor and motor mount square and straight first, then shim as you need to so that you don't have to purposefully fly nose heavy or carry around a bunch of down trim. I just like my planes to stay level and blast ahead full speed when I hammer the throttle and not climb or dive as they accelerate😎

As mentioned in the video, I trimmed about 1/2" off the top of the vertical stabilizers to help reduce drag a bit and improve roll performance. I might experiment with downsizing them even more in a future build, I'm not sure.
As mentioned in the video, current CG location as balanced now is about 1/2" ahead of the stock location or the center of the "CG spectrum" that RC Powers puts on their plans these days. Here is a picture of the "CG spectrum" for reference, I think this was from my first F-22 V5.

On all my V5s from RC Powers, I start off with my CG marked dead center of the solid black rectangle, so looking back at this picture, the CG moved forward considerably on both my F-22s. Here is where the CG is located on the current Raptor. The toothpick indicates where the starting point was, the "T" pin indicates where my plane balances best.

I can't think of much else to share with you at this point that hasn't been either covered in the video or in this blog post.
I am certainly very pleased with the DTF and Depron build, both foams working and holding up very well. This version certainly is "slipperier" than my first one built out of 6mm MPF (Model Plane Foam), so it flies really well even with smaller quad style racing motors with the reduced drag. It is holding up much better than the original all DTF Mig-35B I built and is strong and stiff, so as I learned from previous builds and carried over to builds after this one, combining DTF with other foams for strength and drag reduction is definitely the way ahead for me😊
The F-22 V5 is my favorite of the V5 series as it is such a great all round flier and that F-22 plan form looks pretty cool in the sky😎
If you have any other questions about my build or setup, please leave them below, or if you want other pictures I might have of my build as it went along, please feel free to e-mail me at scott.parkjet@gmail.com.
Park Jet noise...the "other" sound of freedom😎
Cheers,
Scott
Hi Scott.
ReplyDeleteReally appreciate your efforts in putting such an educational and detailed video.
I would like to ask you, which glue do you use to stick the KF foil to the wing (or for large surface areas)?
Based on one of your older video where you suggested 3M spray glue; I had a "mid air separation" luck during the flight once :) any better product now?
Hi Tahir -
DeleteThank you for your interest in my blog and your kind words about the video.
I'm sorry to hear of your separation. I am still using 3M Super 77 spray adhesive to attach my KF airfoils. Thus far I have not had any of them come off. I ensure to put a liberal coat of glue on when I spray it on, then press firmly across the whole area of the KF and then tape down the edges and let it set up overnight before doing any trimming or sanding.
What type of foam are you laminating together with the 3M spray adhesive?
Cheers,
Scott
Thank you for your quick reply. To reduce weight, I am using 3M spray adhesive on Home Depo's Fan-Fold foam, instead of using Dollar Tree or Depron foam. It is not cheap but lot lighter.
DeleteI used Dollar Tree foam a lot, but the paper on it ruins the hard work in long term, as wings become little bendy with time, but still favor Dollar foam a lot.
Hi Tahir -
ReplyDeleteInteresting, I have never built with the Fan fold foam as I can't get it here in Canada. I'm not sure what else to recommend if you don't have confidence in the 3M Super 77 spray adhesive. Like I mentioned, I have used it to bond Dollar Tree foam to both Depron and MPF and haven't had any issues with it separating, but I do put on a liberal coat and when I squeeze it down firmly if any excess squeezes out, I wipe it off and tape the edges down firmly after pressing the whole surface area together firmly with my hands and let it dry overnight before shaping the leading edge.
Do you treat the paper on your Dollar Tree foam with anything? I use oil based Minwax polyurethane and it holds up really well, even when the grass is wet.
Best of luck finding a good adhesive for the Fan Fold foam :)
Cheers,
Scott
Hi Scott,
ReplyDeleteThank you for your reply. I will try few more things. Mean while may I ask a small favor? Would you be able to share the dimensions of Elevator and Rudder of your 5% reduced F-22V5?
I've never purchased F-22, but trying to build a design on my own, while keeping the overall size same as yours for similar flying results. From your comments I got the wingspan 27", and plane length 36 1/4".
Thanks again,
Tahir
Hi Tahir -
DeleteI'm sorry, I don't entirely feel comfortable providing dimensions to areas of the plane I didn't specifically modify.
I provided dimensions of my ailerons, depth of my battery bay, etc based on the premise that people had purchased the plans to the F-22 V5 and might use that as a guideline as once they have purchased the plans, they are free to build and modify in whatever way they choose.
I am not 100% sure it is fair to RC Powers for me to start giving away dimensions to parts of the plane I didn't modify other than to downsize, nor to me or others who actually purchased the plans.
I'm sorry, but having been part of a design team that built and sold plans in the past, there is a lot of work that goes into it with very little reward, so I would suggest you might contact RC Powers at info@rcpowers.com, tell them what you are trying to do and perhaps they might be of assistance.
Good luck :)
Cheers,
Scott
Hi Scott,
ReplyDeleteWell, you are right. My mistake, I wasn't thinking with that in mind. My concentration was to analyse the ratio between the size of wings and elevens for perfect flying models. Didn't even realize which way I am heading.
Thank you for reminding. I will be careful.
Tahir :)
Hi Tahir -
ReplyDeleteNo worries, I just don't want to run afoul of RC Powers :) Often what I have done in the past if I want to modify a plane to more scale dimensions is look at a diagram of an airplane, similar to this one of the F-22 https://en.wikipedia.org/wiki/Lockheed_Martin_F-22_Raptor#Specifications_(F-22A) I will measure the wingspan on the picture and the span of the elevons. To get what the elevons should be, when I make the measurements on the picture in the link, I divide the elevon span by the wingspan and get a ratio of approximately 0.65:1. You might get a slightly different number depending on if you use the picture in the link or another diagram. So if you want a 27" wingspan, to get close to the scale span of the elevons, I multiply 27 x 0.65 = 17.55". I have done this with other dimensions too using the wingspan as the constant, figure out the ratio, then knowing I want a 27" wingspan on my plane, figure out the size of the part I want on my model to be in scale proportion to the wing.
I hope that doesn't sound too complicated, I would say that about 17.5" span is pretty close to scale and you can size them accordingly.
Cheers,
Scott
This comment has been removed by the author.
ReplyDeleteHi Scott,
ReplyDeleteYou just gave me the Holy grail. That is exactly what I was trying to achieve. The F-22 link trick is what I have been trying, but was never able to get that ratio calculation part done.
I can now apply this to any model I make on my own. My dad is in gliders. He did give me few tips but those are very simple and only applies to gliders.
Thank you millions once again.
Tahir
Hi Tahir -
DeleteNo problem, glad to be of help, this method has worked well for me in the past to also determine if a plane could be lengthened or shortened a bit to make it more scale and perform better. The nice thing about foam, once you get your design done and get the first prototype flying, if you find something is too big or too small, you can trim it down, or glue a bit of foam on until you get the flight characteristics you want and then you can finalize your plans to have the dimensions that work the best for you, then build another prototype to see if that is what you want for the final product:)
Best of luck, I look forward to hearing how you make out :)
Cheers,
Scott
For sure Scott, I will do that, and will keep you in loop. Thank you for all the encouragements.
ReplyDeleteTahir