I am passionate about building and flying scratch built foam park jets and passing on my experiences and lessons learned from more than five years of experience. Blog is purely based on my own opinions and experiences. If you have questions, please e-mail me at scott.parkjet@gmail.com. Park Jet noise...the "other" sound of freedom :) Happy flying! Cheers, Scott
I recently shot this "Table Talk" video discussing the tapes and glues I like to use and that have worked best for me for the last few years building my park jets. I purposely dated this post as who knows what glues I might be using in a year or two?😉
As I mention in the video, I am not trying to convert anyone to use the building materials that I use, I understand not everything I use is available or if it is, it may be cost prohibitive due to shipping, etc. I know glue can be a "sticky subject" (pardon the horrible pun 😏) in this hobby, I know from my time on the RC Powers forum I saw folks nearly fight to the death over what they thought was the best glue to use.
I think like many things, it boils down to what you can get, what you can afford and most importantly what you find works best for you. I do like to keep an open mind though and I am always on the lookout for equal or better products for building, especially if they are readily available and inexpensive. Fortunately for me, other than the BSI Foam Cure I will discuss later, I can get all the tape and glue I use locally from hardware, dollar or craft stores.
Tapes
Fiberglass strapping tape, I purchase mine at a local office supply chain in Canada called Staples, I have also found a similar product available at Amazon.com. I use this on the inside of score lines on fuselages, nacelles, etc to act as the hinge and reinforcement to these areas on my plane. It has long strands of fiberglass running the length of the tape as you can see in this picture.
3M Scotch Tough transparent duct tape that I use for my hinges. I can get it at Home Depot locally, here is a link to a similar product available on Amazon. I have also experimented with the Duck brand transparent duct tape that I can get locally at Walmart and although cheaper than the Scotch Tough tape, the adhesive does not hold up as well. Here is what the Scotch Tough tape looks like, you can see thicker strands of fiber running width wise and thinner strands running length wise.
Fiberglass drywall tape. As I mention in the video, using this tape in combination with a glue that dries hard like epoxy or Foam Cure type glue makes for a "poor man's fiberglass and can really help reinforce an area on your plane such as below the battery bay.
Masking tapes. As mentioned in the video, I like to use a decent masking tape to hold pieces together while the glue dries such as noses, fuselages. I have found it a bit of a balance between finding tape with glue strong enough to hold curved pieces together that are under tension while the glue dries, but not too strong that it leaves glue residue all over the foam. The green tape below seems to fit that bill for me and is cheap from the Dollar Store. I like the more expensive higher quality blue tape if I need to actually mask an area while painting as it prevents the paint bleeding under the tape. Unfortunately, the green tape no matter how much I press it down always allows paint to bleed underneath the edge.
Glues
One important note I forgot to mention in the video, always test a new glue on scrap pieces of every foam you might use to build your plane to ensure it doesn't eat or soften the foam before you build your plane with it.
Elmer's Craft Bond spray adhesive. I use this to secure my plans on the foam so that I can cut out the pieces. As mentioned, I like to use a fine mist and keep the nozzle clean so that it doesn't "glob" glue onto the paper/foam and make it more difficult to remove the plans from the foam.
Hot glue. As I mention in the video, I think hot glue after being the main glue folks used for a long time has been a bit "demonized" 👿 when other lighter glues started to become popular in the last few years. I think it still has a lot of great uses, primarily I use it to "spot weld" in small areas to hold parts together when pinning or taping would be very difficult so that I can use a lighter and stronger glue to fill seams. I also use it for installing my servos, it hold strong and is much easier to remove from the servos when I recycle them out of a plane. I like the low temp as it does not melt the foam as easily. As well, since I am using it to "spot weld", the lower temperature glue cures more quickly than the high temp. Each mini stick does weigh 4 gr, so it is always prudent to use hot glue sparingly and scrape off any excess with scrap foam before it hardens to keep the weight of the plane down.
BSI Foam Cure and it's equivalent I get from the Dollar Tree store. This is the primary glue I use to build my planes. It dries light, strong and clear and it can be sanded without pilling or pulling away from the foam. Works best for foam to foam applications, but I don't use it for installing reinforcements in the foam, control horns or motor mounts as it can take forever to cure without good exposure to a certain amount of air since it needs air to cure.
5 minute epoxy. This is my go to glue for installing reinforcement in the foam, control horns and motor mounts as it dries strong, cures quickly doesn't need exposure to air to cure. I also carry one of these plungers in my flight box for quick field repairs where I want to use epoxy and keep flying😎
3M Super 77 spray adhesive. This has worked best for me to install my KF4 airfoils as I can apply a fairly thin mist over a large surface without adding weight, it starts to tack fairly quickly and dries strong. As mentioned, before shaping or sanding, I do like to let it setup over night for best finishing of the leading edge of my wings and KF airfoils.
Expanding Gorilla glue. This is great stuff for filling any gaps around motor mounts or strengthening this area if using more flexible foams like Adams readiboard (Dollar tree foam) or MPF (model plane foam). Apply very little, always easier to go back and apply more as it expands about 10 times what you apply in my experience😲
Here is a close up showing the area around the motor mount and wing plate where I used Gorilla glue to strengthen this area as I described in the video.
So these are the tapes and glues that have worked well for me for a very long time. I have experimented with a lot of different glues over time and these are what work for me, I can easily get them locally and they are relatively inexpensive. As I mention in the video, I think each glue certainly has it's strengths and weaknesses, so I use several to maximize their strengths to make my builds easier without adding excess weight.
You can find the detailed and updated spreadsheet by clicking on this link.
Motors tested today with the numbers at 100% throttle -
DYS MR2205 2750 Kv (Hobby King) currently $15.60 USD (thanks to rcplanepirate, I got mine on sale for $8.60👍) 29.8A/358.6W producing 820 gr/28.9 oz of thrust;
Multistar Viking 2208 2600 Kv (Hobby King) currently $28.14 (again thanks to RCPP, I got mine on sale for $16.10 😊) 31.9A/384.7W producing 960 gr/33.9 oz of thrust;
RC Timer FR2306 2650 Kv (RC Timer) $11.99 USD 30.9A/351.7W producing 878 gr/31.0 oz of thrust; and
RC Timer FR2205 2550 Kv (RC Timer) $10.99 USD 28.0A/322.5W producing 849 gr/29.9 oz of thrust.
Interestingly, the motors below 2700 Kv all have thrust numbers that match up in order with how I rated them in this blog post compared to the Racerstar BR2406 2600 Kv motor with the same prop. Just for comparison, at 100% throttle, the Racerstar 2600 numbers are 31.7A/385.7W producing 982 gr/34.6 oz.
The DYS MR2205 2750 Kv numbers are disappointing, but not surprising. rcplanepirate and I had discussed this motor off and on after he tested his second one that perhaps DYS had produced a bunch of 2300 Kv motors but put the 2750 Kv bell on by mistake 😒(if you click on the highlighted 2300 Kv, it will take you to the HK website where the DYS MR2205 2300 Kv motor is listed).
Comparing it to all the other quad racing motors I have tested, it is actually less powerful than the RC Timer 2205 2550 Kv motor as it produces 1 oz less thrust and is supposed to have 200 more Kv!😲 I put it in the category of motors above 2700 Kv because of how it is labelled, but the closest motor to it in that category is the Racerstar BR2306S 2700 Kv motor which pulls two more amps, but produces 6.3 more oz of thrust! Something not quite right there. The DYS 2205 2750 Kv might still be a good light little motor if you weren't looking for a ton of power, but I certainly wouldn't pay full price for them when I can get a Racerstar 2700 for $8.99 that produces a whole bunch more power.
Still waiting on three more quad racing motors to test on the bench and in the air
Sunnysky Edge R2305 2800 Kv (again on sale, regular price at AliExpress $41.80 (what?!😲), I got mine for half price at $20.90, current price at Banggood is $23.71 (regular price); and
As mentioned in this video below where I discuss my process for finding the ideal balance point on my planes, trimming and adjusting the throws, sometimes it takes more than one session to get my planes really "dialed in" the way I want them and this was no exception.
In my experience, the more high performance the plane is, the more time and fine tuning it takes to get things just right so that I can push the plane and my skills hard without feeling like I am constantly "behind" the plane.😟 This is definitely a high performance plane in speed, acceleration and agility 😀
I ended up adjusting my CG back about 1/8" from what I found was working in the first flight session. This then tightened things up even more around the CG as I moved my battery back about 3/8" to get it optimally balanced. This made response in the pitch and roll even quicker, so as I mention in the video, I dialed back the throws in pitch and roll by 10% (both elevons and ailerons) so that I could keep the plane under control within the limits of my skill level.
This plane is just fast!😀 Even at half to 60% throttle, it is moving faster than all of my other planes of this size (27" wingspan).
After I shot the table talk video above, I went over my control surfaces with a fine tooth comb to ensure I had no deflection with zero trim and it paid off as I was able to take out about half the left roll trim I had from the first flight session. This helps make the plane feel better balanced and I think reduces the drag even more.
As I started to push it harder and faster in tight high speed turns, figure eights, hard pull ups into the vertical, it just seemed to want more, the faster it went, the more stable it feels and it transitions from one maneuver to another at high speed with no problem whatsoever. 👍
It doesn't quite have as broad a speed envelope of it's counterpart the F-22 V5 nor is it quite as stable at lower to mid range throttle, but for top speed and agility, it is quite impressive and easily faster than the F-22 V5. Once I got things dialed in and balanced the way I like them, it wasn't a difficult or scary plane to fly, but because it is moving just that much faster compared to other planes in my hangar, I couldn't relax too much or look away for very long because by the time I looked back at it again it was much further away than I anticipate my other planes to be😲
That is a good thing actually, it is good for me to build and fly a plane once in awhile that pushes me a bit out of my comfort zone and forces me really keep my control inputs even smoother and under control.
Thus far I am very pleased with how well this plane flies and how my build process and modifications have worked out, a real little "rocket" and a blast to fly. Did somebody say 4S?! 😵😏😉
Hi everyone - Before getting into the "meat" of this post, I wanted to provide links to the previous articles since you might find this one first when you open the thread and this way you can navigate to where you want to go more easily.
Well, if you read through the entire thread to this point, congratulations! 👍👏😀 I suppose equally I may have only scratched the surface or gone completely overboard depending on your perspective. In all the time I have been in this hobby and shared my experiences and ideas, I have always felt that if I helped even one person not repeat the same mistakes I have or experienced the same frustration I have, then I am satisfied, so if something here has helped you, then I am grateful for that. I know that despite my best efforts I'm sure some of my opinions and preference came through a bit stronger than they should, I hope I haven't swayed you too much in the wrong direction. I'm obviously a bit biased by what I prefer from my park jets and the fact I was part of a team (NAMC) that produces some pretty good park jets :). Obviously, some of my ideas are very different from those that you might read about on the RC Powers forum and perhaps are very different from yours and that is fine. I don't purposely want to disagree with RC Powers, I wouldn't be in this hobby or where I am at in my park jet career without the foundation of RC Powers and what I learned from their site and it's members. As I grew and learned, I felt I needed to strike out on my own and experiment, what I was learning from some of the folks on the forum weren't working for me. And perhaps some of what I wrote here won't work for you either, and I'm OK with that. If there is one takeaway from this I could hope for beyond really preparing and considering all your options before choosing your first or your 50th park jet is do what makes you happy. Don't be scared to experiment, if something you read or saw doesn't make sense to you, don't worry about going down your own path and not following what I or some "hot shot" on the RC Powers forum says. At the end of the day, the only person you need to keep happy at the field is yourself, not the "masses". Scratch building park jets allows for an incredible amount of self expression, learning, experimenting, failing (yes, there will be that, just part of the hobby😏), but hopefully a lot of succeeding and incredible satisfaction when an experiment you try makes your plane fly better. Another bit of advice I would add is taking some advice from Dave Powers especially if you are a beginner is "master one simple thing before moving on to the next, then master that and so on and so on. Essentially, remember to take the time to walk before you run. I know the temptation is high when you see guys on You Tube ripping around with some pretty cool, more advanced jet to jump from a basic plane to that, been there, done that😳. As I mentioned towards the start of this thread, please try to resist that with all your might!💪 I filled a lot of garbage bags with busted up planes, shattered my confidence on numerous occasions and often couldn't fly because I smashed up all my "advanced" planes that were far beyond my skill level at the time and had an empty hangar until I built some more. Better to be patient and follow your skill level, it will set you up for much better experiences and success in the long term. I still see guys at my field trying to run before they can walk and a few times they just get discouraged and leave the hobby after spending a lot of time and money building planes and buying gear. I don't think any of us wants to be that guy.😐
In closing, I hope that this thread has helped you answer the question "which park jet for me?" or if nothing else removed some mystery behind why some planes fly so great and others might not be worth cutting foam to build them. Certainly follow your own path, have fun, experiment as you see fit, I'm all for that, but if by reading and considering some of what I have presented helps you dial in to the plane that might work best for you, then I am happy 😀 Blue skies and calm winds to everyone! Park jet noise...the "other" sound of freedom 😎 Cheers, Scott
KF orKline Fogleman airfoils are one of the most significant additions/innovations to flat wing park jets in my opinion. They can take a very simple flat wing and add stability, improved wind penetration, increased lift, increased speed and really help to give that "locked in" feeling if you want to fly your park jet with precision. Much has been tested and written about Kline Fogleman airfoils, yet they still seem to be misunderstood or incorrectly applied in the park jet community. I am certainly not an expert by any means, but between Stephan (NAMC chief designer) and I we have done considerable field testing to dial in the correct KF configuration for our NAMC planes. I have also taken these findings across to other designer's planes and have had the same very good results, so it leads me to believe that for swept wing park jets we have a pretty good idea of what works and what doesn't backed up by thousands of flights worth of experience. So how does a Kline Fogleman airfoil work? Well, essentially, here is a simple (simple is good for me😏) description from the Wiki link above. "The purpose of the step, it is claimed, is to allow some of the displaced air to fall into a pocket behind the step and become part of the airfoil shape as a trapped vortex or vortex attachment. This purportedly prevents separation and maintains airflow over the surface of the airfoil."
There are numerous varieties of KF airfoils as shown in this picture below, I will be discussing KF2 and KF4 in this post as they are the most popular for park jets. I know it is difficult to read the description below each one, but looking around Google, you can probably find much more information about the more exotic or complicated setups.😊
This video hopefully gives you some visual idea of what is happening as air flows over a wing with KF airfoils.
The video above shows a straight wing where the normal rule of thumb is that the KF extend to 50% of the total chord of the wing at the root and tip. Through considerable testing, experimentation and some discussion with Scott Lott and Dave Powers (Scott Lott was the primary designer of all the RC Powers planes up to and including the V4 lineup), once you start to sweep the wing even slightly, this number decreases to about 40%. So if you are adding KFs to a plane where the designer has not included them or you want to modify existing KFs on a plane, 40% is a very good starting point for most swept wing park jets, even a moderately swept wing like the RC Powers F-18 V3. At about 0:55 in the video below, you can see/hear Dave Powers discuss the 40% starting point which just seems to work well on almost every wing configuration I have ever tested.
With our NAMC planes, we actually took this a bit further as we fine tuned things at the field, our KFs are very close to 40% at the wing root, tapering down to about 35% at the wing tip, but if you are playing around with KFs on a plane, 40% of wing chord overall is a very good starting point.
A few things of note from Dave's video that my experience has taught me. While I agree to a certain point that the addition of KF airfoils do help strengthen the wing, I would never use them in place of recommended carbon or other reinforcement in a wing, there will still be too much flex. I have found that when really dialing in a plane for best precision and performance, that a few mm between trailing edges top and bottom when using KF4 do make a difference in how the plane performs. Having said that, you can certainly trim KFs down to really optimize the plane for how you want it to feel as we all seek different feel and performance from our park jets. Lastly, we found through testing that KF2 while popular with RC Powers and others degrades the precision and handling of your park jet by about 15-20% as the increased and unbalanced lift cause the plane to "float" and the controls to be "mushy" and very slow to respond in turns if you get too slow. I'm not saying your plane will fly "horribly" with KF2 airfoils, I'm simply passing along what I have seen in extensive testing with many KF configurations. More discussion on that later. Actually most park jets will fly quite well without any sort of KF airfoil, so if in doubt, cut them out, fly it without the KFs, then add them on and experiment later to get the feel and performance you seek. Without the KFs, you do lose some added lift, wind penetration and speed, so for some inexpensive foam, KFs can really add another level of performance to your park jet. KF2 does seem to be a popular setup as some folks like their planes to feel "floaty" and have better slow speed characteristics. Fair enough, KF2 will give you that if that is what you seek. However, I know this flies (pardon the pun😏) in the face of what most folks say, I personally think and have found through hard earned experience that KF2 are not a good set up for beginners and here is why. This is a bit of a repeat of what I have already said, but I'll drive it home anyway. KF2 causes the plane to "float", but also at times when slow have a mind of it's own. The first park jet I ever built was the RC Powers F-35 V2(no longer available) as you may have already seen in the intro post of this thread. I followed RC Powers advice and put KF2 on the plane as I didn't know any better and as I was losing control of my plane in turns, still didn't know any better as I put it down to me being such a new and not very good pilot. As my experience grew and I tested them further on our NAMC planes, I realized that compared to no KF or KF4, the KF2 made the plane feel very "mushy" and slow to respond in turns, in fact if I was to put a number to it, the response and crispness of the plane was reduced by about 20% over no KFs or KF4s. So I ask myself and I guess I ask you, is that a good thing when learning? I personally don't think so, we all tend to panic and over control a lot when learning, especially if our plane doesn't respond when and how we want it to. I "over controlled" my F-35 V2 numerous times into the trees/ground, etc because it was very slow and sluggish to respond to inputs and would float/slide itself around turns. Then I would hammer harder on the controls, it would stall or go the opposite direction and normally a "walk of shame" would then ensue 😳. Although this video is using a flying wing, it is a swept wing like a park jet and I think shows how much more stable and precise the plane is with KF4 versus KF2.
So getting back to why starting the KF depth at 40% of total wing chord at the root and tip and why it just seems to work and why getting too much less or too much more than that doesn't.
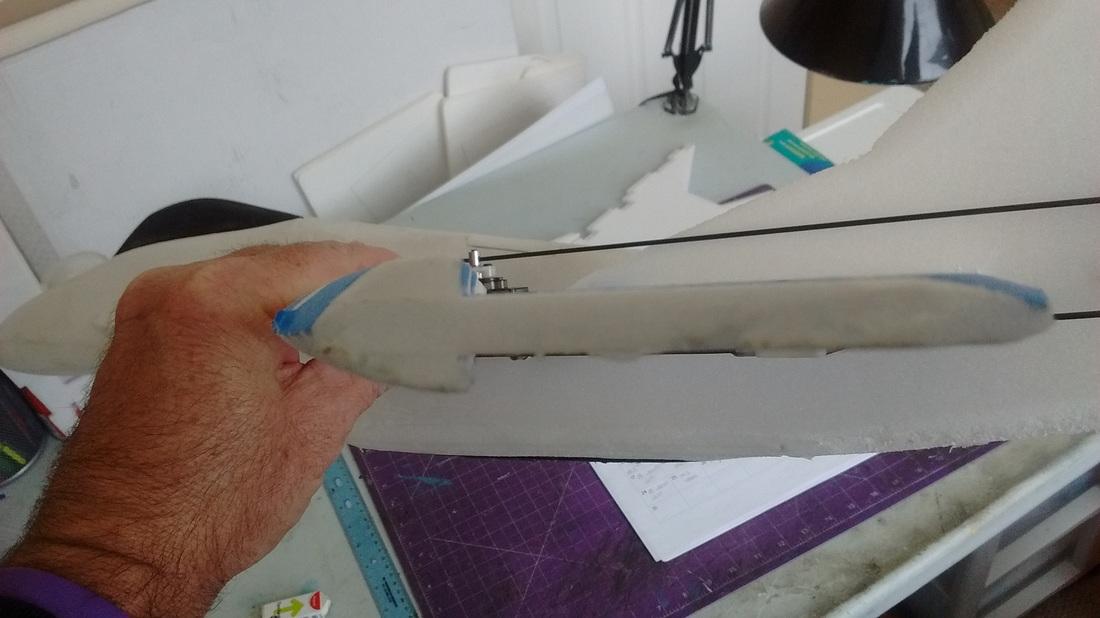
I have flown planes with 30% KFs up to 60+% KFs and the results were not great. To keep it in context, from this point on I will be discussing KF4 as I think they are the best overall configuration for speed, balance, stability, wind penetration and precision for 99% of park jets. In all honesty, you are better to go smaller than larger. If you go smaller than 40%, you start to lose a little bit of the stability effect to the point if you make them too small, there really isn't any point in having them at all. What I have experimented primarily with in our development of the NAMC Mig-35B/Mig-FA as well as other designer's planes is when the KF gets too big and what happens to the plane. I found it easier to start off slightly large and then trim off foam as I went rather than start small and try to glue small strips back on. Obviously, I don't have wind tunnel data or video to back this up, but rather lots of hours spent at the ultimate park jet laboratory, the flying field. What I have found happens is that the further the trailing edge of the KF goes in relation to the wing chord, flying straight and level it does become super stable, but as you start to maneuver the plane, this over stability starts to fight back with some very negative behaviors. Stephan and I have discussed it at length and our thoughts are is that as you manipulate the "bubble" of the KF further back, the center of gravity (CG) and center of lift (CL) start to work against each other and not in harmony. Back to something I mentioned in the last post, as you start to push a plane's setup too far in one direction aerodynamically, other aspects of the performance envelope are bound to suffer and this holds true with KF size as well. Here are some characteristics I noted with KFs that are too large. In turns, the plane almost fights back, becoming difficult to keep tracking straight, it can get "floaty" or "mushy" or just as quickly be too precise and twitchy. I know this sounds over simplified, but the plane almost acts like a toddler throwing a temper tantrum, just not a smooth or fun flight experience and very unpredictable at times. Second and perhaps most significant is it can require much more effort to get the plane to pull out of dives or loops. Having the KFs too big really effects the ability of the plane to respond quickly in the pitch axis which if you aren't ready for it can lead to a walk of shame as your plane theoretically pulls out of the loop too low 😨 A couple of other notes we found through testing KF4 airfoils. You can use up to the same thickness as the foam you built with, although slightly less seems to work best as it reduces the thickness of the wing and reduces drag. However, whatever you choose whether it be 6mm MPF, paperless dollar store foam (about 4.5mm thick) or even 3mm foam, use the same thickness top and bottom. Stephan and I have both tried what I have heard referred to as "KF 3.5" where the top layer is thicker than the bottom layer (6mm top and 3mm bottom for example). The claim is that it uses the best of both KF2 and KF4 properties. For how I like my planes to fly, I disagree as I find it is much closer to KF2 than a compromise of both and also causes even more imbalance between the top and bottom of the wing. If you do decide to try out KF4 airfoils, another important note I have learned the hard way is to ensure that the trailing edge of the top and bottom airfoils are as close to even as possible. I know the angle of the picture below might show these as being off a tiny bit, but they are equal along the trailing edge. If either the top or bottom trailing edge is even a couple of mm further back than the other, it can cause your plane to unexpectedly dive or zoom as speed increases and the difference in the "bubbles" is amplified. If you do put KF4s on your plane and you find it has these tendencies as it accelerates or decelerates, this would be one of the first things I would check.
You may also note that the leading edge has been shaped so that it is symmetrical. I have used a more "chisel" type of leading edge early on in my park jet career and found it to cause a lot more drag and instability, so having a symmetrical leading edge like in the picture seems to work the best for overall performance with KF4 airfoils. There are also arguments that having the leading edge rounded works best. Honestly I have not tried that, perhaps because the setup above has always worked for me and I don't want to mess with success😉 So there is certainly lots to consider and to experiment with concerning KF airfoils on park jets. They are a very simple and inexpensive performance upgrade requiring some inexpensive foam glued in place and will transform your plane into a whole new "animal" at the field 😊 For testing purposes, you can even tape them on to try out, just don't affect the step along the back or you defeat the purpose of the airfoil. On the reverse side though as hopefully I have explained, they can also take your already decent flying plane and handcuff it, like putting a speed and handling governor on a high performance sports car, probably not something any of us wants to do 😏 In the next and final installment, some final thoughts to wrap up this thread. Not to "name drop", but when this article first appeared on the old NAMC blog, I was honored that Dick Kline himself (The "K" in KF) commented on that post, I have pasted our conversation below as a post script.
Park Jet noise...the "other" sound of freedom😎 Cheers, Scott
Chat with Dick Kline
Scott... Enjoyed reading about your research on the KF concept. KF airfoils are designed for power because it takes energy to create the vortex. With the vortex employed, you have excellent control over your aircraft. Thank you for exploring this subject. Did you ever complete your final installment? ~ Dick. The K in KF
Hello Dick - Very honored that one of the inventors and innovators of such a simple yet amazing addition to model airplanes would find this article. Thank you so much for your kind words and response. Very interesting insight as to how the power affects the vortex, KF4 have certainly been one of my absolute favorite addition to foam park jets, so I like many others am in your and Floyd Fogelman's debt for this invention. I did write a wrap up article to this thread about "Which Park Jet for me", you can read it here http://www.migsrus.com/blog/which-park-jet-for-me-some-final-thoughts All the best to you and Floyd and thanks again for taking the time to write to me. Cheers, Scott
Dick - Sorry in my excitement I forgot to make a very important acknowledgement. Much of what I know and have learned about the proper thickness, depth in relation to wing chord, etc about KF airfoils on foam park jets has been the result of hard work, knowledge and testing by my NAMC partner Stephan Moran. He is the scientist and chief designer behind all our NAMC airplanes to date and I have learned an incredible amount from him and through lots of fun flying and testing at the field. Again, all the best! Cheers, Scott
Reply
Dick Kline
7/29/2017 02:43:33 pm
Scott... it is great to acknowledge Stephan Moran for his contribution to your knowledge base. He also showed that he believes in you which gives you permission to believe in yourself. We ALL need that in our lives when we are young. And, we are all creative because creativity is all about problem solving. Always acknowledge your own creativity to yourself. It empowers you to be even more creative. ~ Dick
Hi Everyone - I don't have a lot of experience with leading edge flaps (only tried them once) or canards as they don't fit that well into my flying conditions and flying preferences, but I have tried them, so will relate my experiences. If they are something that interests you to suit your flying style and conditions, there are certainly folks who have written considerably about them on the RC Powers forum, so not to pass the buck, but I would direct you there to start searching for more info if my thoughts don't satisfy your curiosity 😊. Where I fly, I have dead calm still days or days with less than 5 mph wind less than 20% of the time. I fly primarily in conditions with winds of 5-10 mph, so having a plane that can handle wind well is pretty important to my flying situation. What I mean here is having a plane that I can still fly relatively smoothly and perform basic aerobatics while it is a bit windy. I suppose I could throw any plane in the sky in these conditions, but I don't like being in a situation where I am basically "surviving" the wind and not having any sort of fun at all. Not a relaxing way to fly and enjoy myself in my experience. As you read through the rest of this post, you will probably realize why I rarely build and fly planes with LE flaps or canards. Leading edge flaps When I read posts on the RC Powers forum from those who are big supporters of LE flaps or who design them into their airplanes, essentially my takeaway is that they enhance slow speed flight. I would agree with that, but my experience is that having these fixed flaps on the leading edge narrows the overall flight envelope quite a bit as a sacrifice to enhancing slow speed flight.
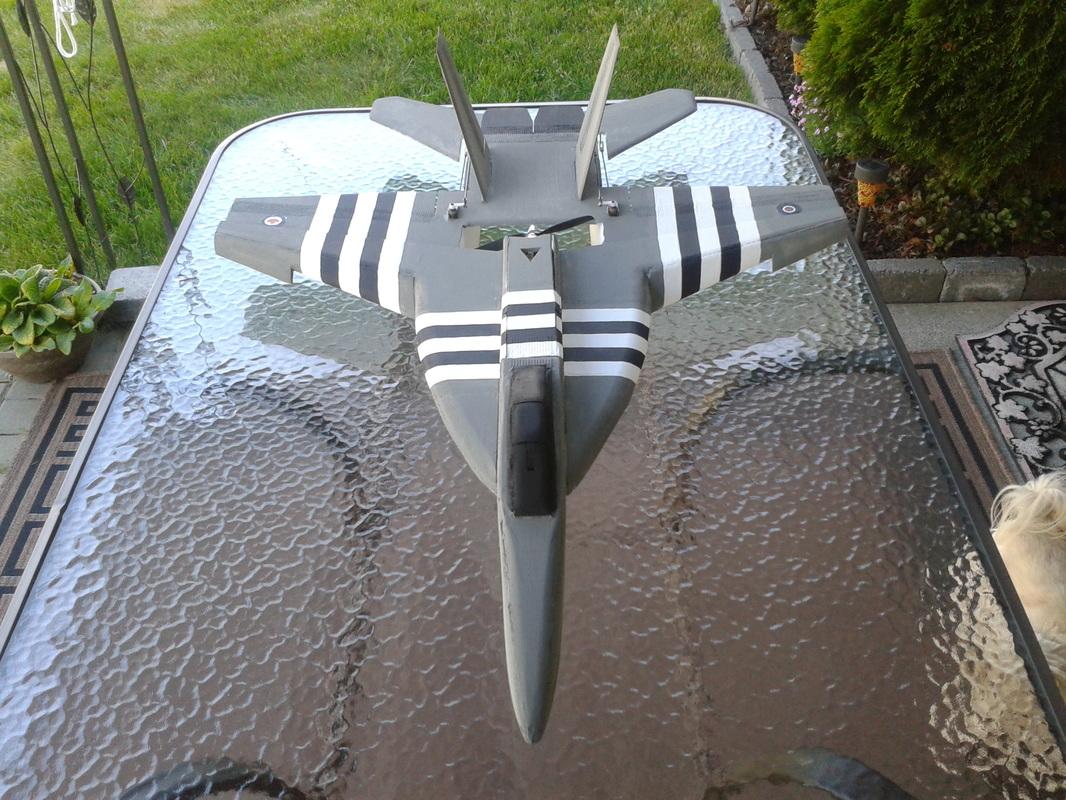
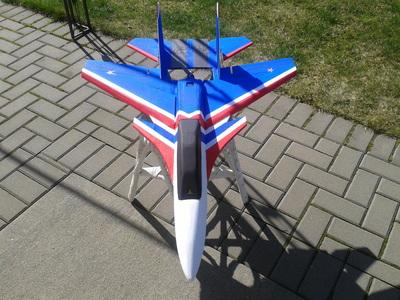
The RC Powers F-18 V4 pictured above is the only plane I have flown with fixed LE flaps. It is difficult to see, but this plane also has KF2 airfoil (KF added on the top of the wing only). I do agree that in calm conditions it did improve slow flight handling compared to the F-18 V3. My initial thoughts on this plane were that it was an amazing improvement over the F-18 V3, but the more I flew it in varying wind conditions, the less I liked it. I'm not hiding anything here, I have discussed this all privately with Dave Powers of RC Powers, but this setup became one of my least favorite park jet setups of all time and after about 50 flights, I retired her, beautiful paint job and all 😳, it was just not much fun to fly for what I expect out of my park jets. Here is what I found was happening. The leading edge flap was causing drag and as speed increased more turbulence and less stability. With KF2 as it got slow, the controls could also get a bit "mushy", not a feeling I like in my park jets. In windy conditions, with those angled flaps, it would get bounced around unexpectedly in a way that was hard to predict and often hard to handle. So I realized for conditions in which I normally fly and my flying preferences, leading edge flaps were not for me. When the RC Powers Su-27 V5 was first released in Oct 2015, as soon as I saw leading edge flaps, it went on the "I doubt I will ever build this" list for me. However, I continued to follow the thread on the RC Powers forum with mild interest as it was an Su-27 and I hadn't had one of those in my hangar yet. Unfortunately, it got a lot of bad press initially, one of the key things that I saw was that more than one person reported it was a calm wind plane only. Again, this confirmed for me that perhaps the leading edge flaps were contributing to problems with how this plane flew and handled the wind. After several months, I noticed that guys were modifying it to fly without the LE flaps with either no KF airfoils or KF4s, so I figured I would give it a try and it has turned out to be just an awesome flying plane. I never really treated her to much of a paint job, but I put over 300 flights into this great flying plane 😀
Canards I have flown three different planes with canards, Su-37, Rafale and the recent RC Powers Eurofighter V5.
If you read through the RC Powers threads, there are a few guys who set the canards up to be moving to provide better airflow over the wing when slow in high angles of attack. From what I have read it does require more weight with linkages and a servo and far more complexity in plane and transmitter setup, so it has been nothing that has interested me. But if you are looking to have a plane that is fully optimized for slow flight at high angles of attack, by all means experiment. However, like about 90% of the rest of the folks who build park jets with canards, I have always had them fixed (ie non-moving). When flying in dead calm to very light wind conditions, they do reduce wing loading, making the plane feel a bit lighter on the sticks and when comparing a Su-37 to a Su-35 (same plane but without canards), the Su-37 does feel smoother in calm wind conditions. I do find the canards slow down pitch and roll performance slightly over non canard planes as they do create drag and resistance in these axes. Additionally, even in calm winds, having that extra lift further forward can contribute to the plane wanting to "zoom" or climb on it's own as speed increases. I found this tendency to be the worst with the Eurofighter V5 as the canards are quite large and quite a bit further forward of the wing than the Su-37 and Rafale. Bring on the wind and in my experience, planes with canards can start to become a real handful as the wind hits them and really pushes the nose around. Whereas I fly many of my non-canard planes in winds above 10 mph, I rarely fly a canard plane in those conditions, I find they become too unstable, unpredictable and not much fun to fly. So that essentially sums up my experience with LE flaps and canards, in calm winds they are fine, certainly canard planes look very cool and modern in the air, but what the eye sees and what the wind "sees" are two completely different things in my experience. LE flaps do perhaps improve slow speed handling and stability, but with many things to do with aerodynamics, if you push one part of the flight envelope too far one way, you pay penalties in other ways. So certainly give them a try if they interest you, I would strongly suggest doing your maiden flight with LE flap or canard planes on as calm a day possible before experimenting with any wind. These are just my experiences, perhaps yours will be completely different 😀. In the next article, I will discuss KF airfoils, something we have done a lot of testing with in the development of our NAMC planes and I have tested on other designer's planes as well.
Park Jet noise...the "other" sound of freedom😎 Cheers, Scott