Wednesday, January 9, 2019

Resizing Park Jet plans to print from home computer - 09 Jan 2019

Hi Everyone -

If you have been following this blog and/or my YouTube channel, you may know that I often will downsize a plane from it's "stock" size(what it would be if printed at 100%).  Since I have been using quad racing motors in my planes I do this quite often as I like the planes to be a little smaller to compensate for the lower torque and of course to help them go faster😃😎

Most park jet plans come in "tiled" (you print them off at home and then tape the sheets together to make one large sheet of plans) or "untiled" where you can send them to a professional printer and have them printed.  Unfortunately, most designers "lock" their plans, so without a password, you can't get them downsized by most print shops using the "untiled" format.  However, there are a couple of options I have found that work well using your home computer and printer. 

I am using Windows 10 on a PC and always have, if you use a Mac or other operating system, I'm not sure if your print window will look the same.  I have taken pictures of my computer screen, I apologize the pictures aren't terribly clear, but hopefully it will help you out.

Tiled

If you decide to use the tiled plans, the only option is to downsize.  I have had reasonable luck with these aligning for most park jet plans.

So using an RC Powers Su-30 V4 set of plans as an example, if I want to downsize to 85% lets say, once I enter the print window, I go to this area and select 85% under Custom Scale.
I also like to select Print in grayscale and Save/ink toner as there will be several sheets printed and I like to save as much ink as possible😃
When you look in this area of the window, it will give you what size the printed area will be on each sheet of paper (this is based on 8 and 1/2 x 11", I'm not sure if it does the same thing for A4, most plans are based on 8 and 1/2 x 11").  You can always print off one sheet to see how it looks, then if you are happy print the whole plan off and then trim and tape together.
I have found more often when doing it this way that there might occasionally be places where the parts don't line up exactly, so you have to take some care to "extrapolate" a bit when taping together or cutting the foam to get good pieces from which to build your plane.

Untiled plans

I seem to have the best luck getting the plans to line up using the "untiled" plans and printing them using the Poster function in the print window, so that has become my choice for resizing plans I have to print on my home printer.

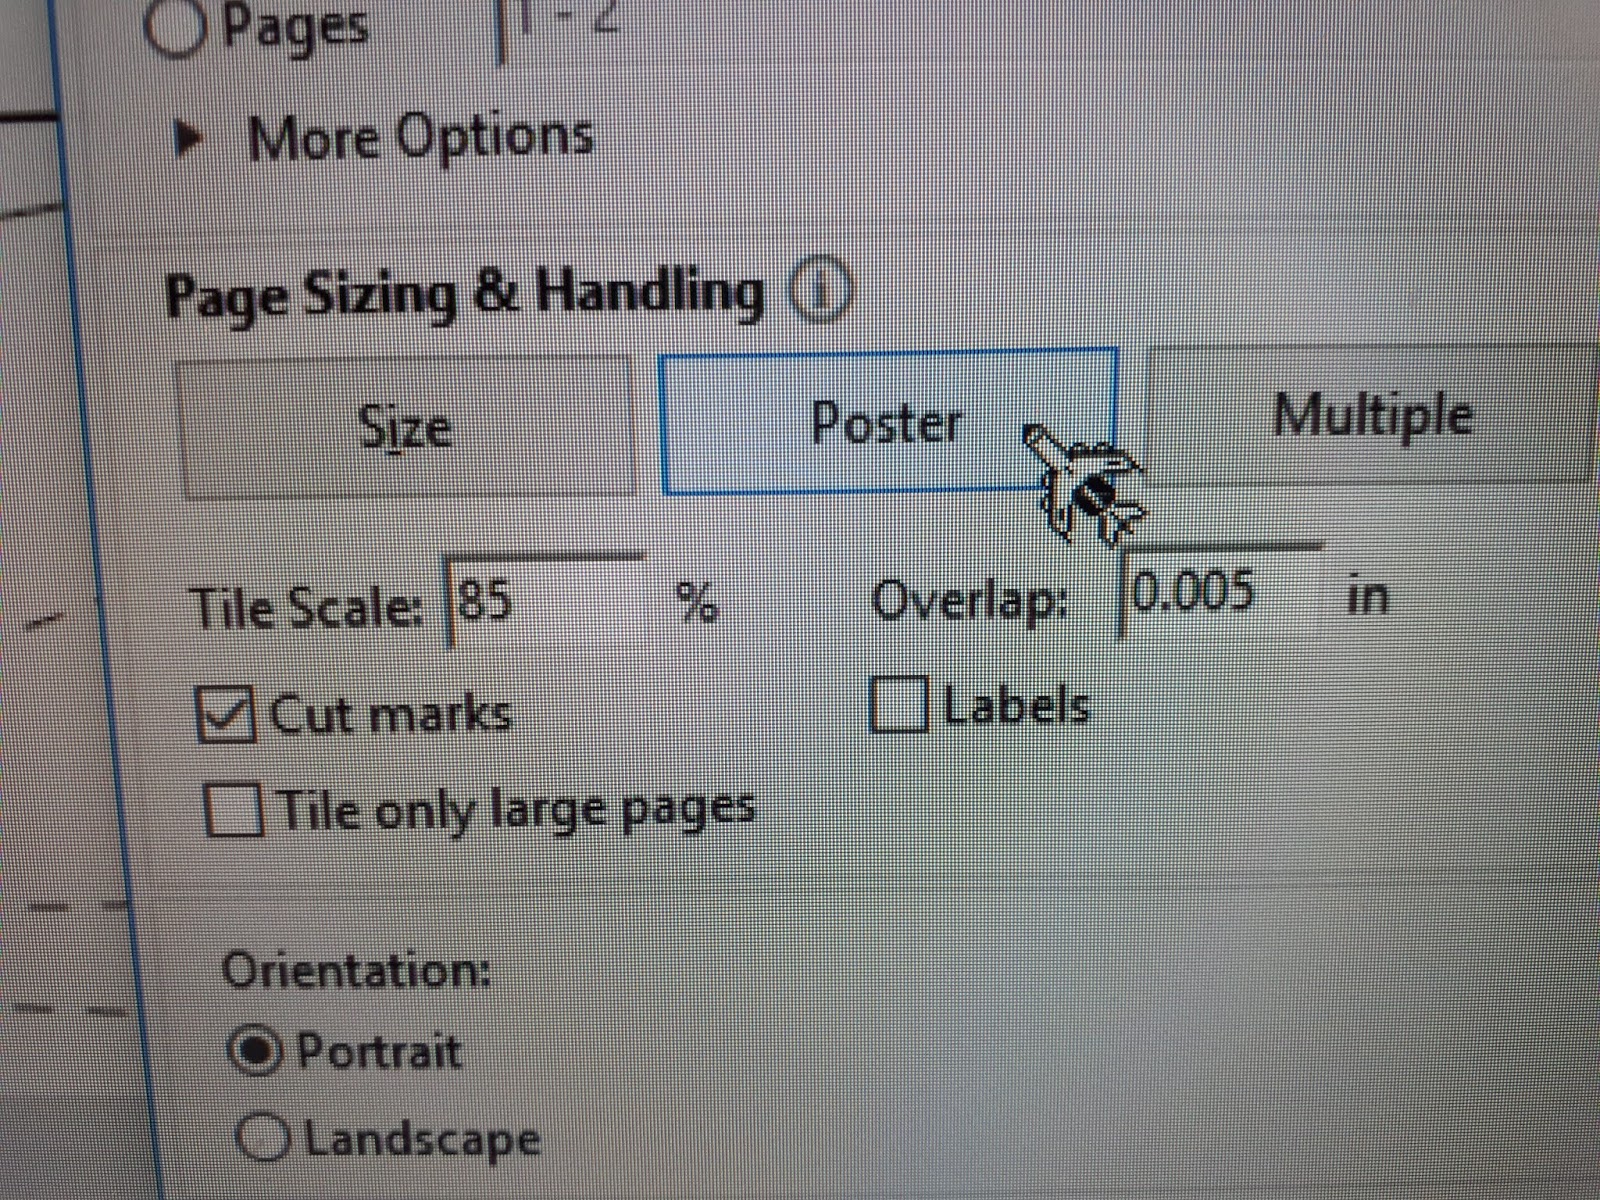
After selecting Print, go to "Poster" and you will see these selections.  Put in the scale you want in the Tile Scale window, I leave the Overlap the way it is and then select cut marks.  The cut marks will give you small guide markers to help aligning the pages.  You may still need to trim and tape the pages together just like when using the "tiled" setup.
After selecting the scale you want, you can click on the right side of the print window in the area where you see the magnifying glass with the "+" sign.  It will calculate how many sheets of paper will be required to do the job.  The dashed lines show how the original "untiled" plans will be divided into individual sheets of paper that will then have to be taped together so that you can cut out the parts.
Again, if you want to minimize the amount of ink used, select Grayscale and Save ink/toner as described above.

Although I have never tried it, you should also be able to "upsize" plans using the "untiled" plans and this method.  Just as an experiment, I typed in 110 in the Tile Scale  window.
As you can see below, this results in several more sheets of paper being required to print these larger plans.

Cutting plans after resizing

One thing you do need to be conscious of when cutting out the plans after resizing is ensure that the slots you cut will fit the foam you are using.  I have found that normally when downsizing, if I cut the slots along the outside edge of the black line that denotes them, most foams will fit snugly.  Better to cut a little narrow as you can always gently pinch the foam of the tabs to get things to fit when you do your dry fit, but cutting too big and the plane will not go together easily.

Cheers,

Scott


Thursday, September 13, 2018

Quad motors in park jets - summary after over a year of testing - 13 Sep 2018

Hi Everyone -

This summary has been a long time coming and if you already follow this blog and my You Tube channel, much of what you are about to read or watch has already been covered.  However, I wanted to do a bit of a wrap up to review some of the more important points and some of the items I may not have discussed to this point.😊

I have certainly become a convert to using quad motors in my single motor, prop in slot park jets.  Their light weight and incredible power certainly fits the way I like to fly.  Of course this power does come with a cost in both money and amp draw and requires some consideration about which plane to choose and how to build it, but for me it has been worth it.

Here is a video I shot that this blog supports.


I mentioned three major sources of information that I found very helpful making the correct choices to achieve the power setups I was looking for.  Here they are.

You can also find all the my bench test data on my motor test spreadsheet.  Each motor I tested has it's own page, so if you scroll along the bottom you can navigate to whatever motor you want to view.  Also on this spread sheet is test data from the 2212/6 2200 kv and 2212/5T 2700 kv motors which are the two most popular park jet motors around and what I replaced in all my planes.  I put this data there for info and to compare.  Also, rather than providing links to every motor, prop, ESC and battery I used in testing in this blog post, you will find links to all of these on the motor test spreadsheet.  Where applicable, I also put what custom settings I selected on certain ESCs to maximize performance.  All these setups have been thoroughly tested at the field also.

I also started a thread on the RC Powers forum which may also cover some items missed in this blog post or videos.

From the first post of the RC Powers forum thread, here are the advantages and disadvantages of using quad motors over the more conventional 2212 motors in 2200 and 2700 kv.

Advantages
  • quad racing motors tend to be much lighter, saving anywhere from 15-25 grams just in motor weight alone;
  • paired with the right prop and ESC, they can produce equal to or often far more power than the standard 2212 2200 kv or 2212/5T 2700 kv motors, so very high thrust to motor weight ratios;
  • with so much time and effort being put into the development of lighter, more powerful quad racing motors all the time, the performance is increasing in leaps and bounds whereas the 2212 2200 kv motors other than perhaps becoming cheaper, have not changed much in the last several years from a standpoint of weight and power output;
  • although quad motors are often more expensive, because there are so many different companies making them, the competition is fierce and you can often find them for a very reasonable price. For example, I have only paid full price on about 25% of the motors I have purchased in the last year, the rest were all picked up on sale (although one could say I might have gone broke saving money😏);
  • many quad motors are designed to be run on batteries from 2-6S, so a wide choice of battery options;
  • if you find a motor you really like, they are often sold in bunches of four at a more reasonable price.
Disadvantages
  • due to their smaller physical size, they often might not have the torque of a 2212 2200 kv motor. Even though the test bench numbers might show incredible performance, sometimes because they are about half the physical size of a 2212 size motor, they just don't have the "muscle" to push a larger, "draggier" plane around or deal with windier conditions. Therefore airplane size and weight becomes very critical. I have found that planes with about 27" wingspan or less and under about 21 oz AUW work the best, as always, the lighter the better;
  • when you build your "prop in slot" plane, you do need to adjust the front of the prop slot quite a bit to compensate for the much shorter "bell/can", otherwise the prop will run far too close to the leading edge of the prop slot causing a lot of noise and causing the prop to run much less effectively/efficiently;
  • with a couple of exceptions, I have found that motors with a stator size of 2306 or better (2406, 2307, 2207, 2208 for example) and greater than 2600 kv seem to give the best power when looking for equal or better power than produced by the 2212 2200 kv motor setups;
  • they are often considerably more expensive than 2212 2200 kv motors which can often be found on Ebay for $5 USD, but there are some fairly reasonable options available that are pretty peppy and much lighter than a 2212 2200 kv motor setup; and
  • they are considerably more "amp hungry" than the 2212 2200 kv motor, normally requiring a 40A ESC on 3S whereas you can often run the 2212 2200 kv motor with a 30A ESC.
As mentioned in the first video, here are the final reviews I did organizing the motors into "budget", "middle of the pack" and "serious power where cost doesn't matter"😉

Budget/value


Middle of the pack (includes a couple of motors to avoid)


My top five choices where cost and efficiency isn't an issue😎


I have also created several playlists to organize other "table talks" about motors, ESCs, batteries that I tested during this process.  As time goes on and I have evaluated these components more thoroughly, these play lists will be updated.  Also is a playlist of all the flying tests at the field.

Thorough reviews of individual quad motors can be found here.  

ESC reviews can be found here.

Battery reviews can be found here.

Field testing play list can be found here

One thing I should mention that I did not mention in the video, if you don't want to spend money on new ESCs, experiment with higher timing and different PWM settings if you can.  Even if you don't have a thrust stand to evaluate, normally the quad motors I tested all seemed to like a pretty high timing setting for max performance.  Having said that, monitor the heat build up carefully in your ESC as often most ESCs will run warmer with a higher timing setting.

So certainly none of this information is exhaustive and I will continue to evaluate and learn as my park jet journey continues.  I may still test the odd motor that comes along but for now I am pretty satisfied with the setups I have discovered and will continue to use quad motors in my park jets for the foreseeable future😊

Park Jet noise...the "other" sound of freedom😎

Cheers,

Scott


Wednesday, July 18, 2018

Setting up the FlySky FS-i6 transmitter for use with RC Desk Pilot simulator

Hi Everyone -

In my continuing journey experimenting with and evaluating the very inexpensive and capable FlySky FS-i6 transmitter, I recently set it up to be used with the free to download RC Desk Pilot simulator.

I should also add at this point that my transmitter screen may look different than yours if you have the stock FlySky FS-i6 as I have done a firmware upgrade to have a timer, 10 channels, etc.  You can learn more about how that went by watching this video.
I got the inspiration and information I needed to accomplish this in the easiest and most inexpensive way by watching this video by Mirko FPV.
I picked up the required cables from Banggood and Ebay.  I couldn't seem to find both suitable cables from just one vendor unfortunately, but shipping was free from both😊  Here are the links.

I went to the SmartPropoplus website to download that software so that my transmitter could interface with my computer.  When you clink on the link, you can do much more reading about the basics and more advanced properties of SmartPropoplus.

Once loaded up on the computer, this is what it looks like before connecting the transmitter.  A few shots taken from my computer screen, apologize for the quality😊  I should mention that I have a PC using Windows 10 in case you have another setup or a Mac, I do not know if it will work or look like the pictures below.


Since the transmitter must be turned on when using the simulator, I built a "plane" in my transmitter strictly for the sim so that I would not interfere with any settings on my real planes.
I then connected the two cables, plugged them into my transmitter and computer and opened SmartPropoplus.  If the transmitter is turned off when you do this, you will see transmitter disconnected in the bottom window.
On the Transmitter page, you want to select Standard in the PPM window, I didn't change anything else at this point. 
I did check the Joystick page to ensure that when I moved the sticks, the green moved up and down accordingly and matched the channels in the transmitter.  I have a Mode 2 transmitter, so Channel 1 is aileron (roll), Channel 2 is elevator (pitch), Channel 3 is throttle and Channel 4 is rudder (yaw).  I'm not sure why it shows channels 7 and 8 active, however, I didn't worry about that too much as RC Desk Pilot is a simple simulator with primarily 4 channel or less models in it's data base.  I couldn't really see any way to change this in SmartPropoplus anyway😊 vJoy 1 is the only selection I had available which is my transmitter.
I'm not sure if it makes a difference, but on the Input page, I selected "Auto" on the Bit Rate and Audio source channel in hope that the computer would optimize the settings.
Once SmartPropoplus is happy and the transmitter is turned on and communicating correctly with the computer, you should get this message at the bottom.😊 If not, it will give you a message of what needs to be corrected before the transmitter will communicate properly with the computer.
I then downloaded RC Desk Pilot to start setting that up.  Here are a few notes of the requirements from the downloads screen.  Interestingly, I guess with my Windows 10 computer, as I was going through the download process, it would not download RC Desk Pilot until DirectX 9.0c was downloaded, the "down loader" essentially told me this and I just agreed as I went along and it worked out fine.😁
RC Desk Pilot is fairly simple to use, to make any changes, you need to "hover" your mouse cursor in the top left corner of the screen to make changes, selecting "menu" will take you to the page you need to ensure your controller is working properly.
Once you select menu, you go to this page where you can change between aircraft and other items, to set up the transmitter, select controls.
Your transmitter may be different I'm not sure, I had to change most of the channels in this menu to correspond to the appropriate channel/axis on my transmitter controls.  
Also of note, I had to reverse three of my channels to get things working properly.  Fortunately, when you have your plane on the runway in RC Desk Pilot, you can see the controls moving when you move the sticks, so that is a visual way to see if things are set up properly.
There are several other settings you can experiment with, but I won't go into those here, I simply wanted to cover the basics so that you can get your FlySky FS-i6 connected to a simple and free simulator😊

Park Jet noise...the "other" sound of freedom😎

Cheers,

Scott


Sunday, July 1, 2018

"Table Talk" - How I make KF4 airfoils for park jets

Hi Everyone -

I am asked often about how I do KFs for my park jets, so I thought it time to do a more detailed video rather than trying to answer the same question numerous times.  Some of the information in the video below is obviously opinion and suited to how I like my planes to fly, but it is also backed up by a lot of field testing of different size and shapes of KF airfoils across a wide variety of planes.
Here is the link to the blog post I wrote as part of my blog series called "Which Park Jet for me?".

A close up picture of my drawing for the F-18 wing plate mock up I used in the video above.
The terms "fuselage notch" and "engine notch" are unique to RC Powers V5 plans, so when drawing the top KF on other plans, I just ensure I make the inner line along where the fuselage will be.  Then again for the bottom KF where the inner edge is indicated in red (sorry that it is a bit blurred😕), it should go along the outer edge of the engine/nacelle/intake part of the plane along the bottom.

Here is the close up picture of a Mig/Su style swept wing where the trailing edge sweeps forward.  The measurements and calculations are essentially the same as shown above.  Once I make the calculations for the wing area, I also draw out the top KF using the LERX which you can see in orange at the top of the picture.
For F-22/T50 style wings, it can be a little bit trickier as the wing has such a unique shape, so as mentioned in the video, I don't use the normal trailing edge to calculate the 40% as this would cause the KF to be too large.  In the case of this style plane, not only could this introduce more drag and the negative behaviors mentioned in the video, since the horizontal stab and elevon are so close to the wing, the "vortex" caused by the KF could interfere with these if the KF was too big.  Once making the calculations for the wing, I also include the area along the intake marked in orange at the top of the picture for the top KF.
In the video, I realize I might not have done a very good job of explaining how to trace out the bottom KF if you don't use the method of recycling the plans to cut them out.  In the picture below, I have highlighted the outer edge of the top KF in orange and drawn a line in red where the inner edge of the bottom KF would be.

Imagining that you have the top KF cut out, what I do then is lay it on another piece of foam and trace the portion to the left of the red line, making marks or using pins to mark on the foam where the inner edge of the bottom KF will be.  Then I join all the lines and cut out the bottom KF.

KF airfoils are certainly fun to experiment with and with a little foam and testing it is an inexpensive way to enhance the performance of your park jet or any other foam plane for that matter.😊  

Park Jet noise...the "other" sound of freedom.😎

Cheers,

Scott

Tuesday, May 22, 2018

Initial impressions and bench testing of the Brother Hobby EngineerX 2307 2700 kv motor

Hi Everyone -

I recently completed a bench test session of another quad racing motor I picked up to evaluate, the BrotherHobby EngineerX 2307 2700 kv that I picked up from Banggood.  I picked mine up for $23.99 USD, I notice the regular price from Banggood is $30.67, although at the time of writing this blog post it is on sale for the same price I paid.
I discovered this motor watching EngineerX's YouTube channel, here is his test video of this motor before it was released to the public.

I was very pleased to be able to exchange a few words with him about this new motor.  He mentioned that it might not be for all out speed, but perhaps very good torque.  If you want more details about the "guts" of the motor, please watch his video as he takes it apart and shows the details of the motor.

Mine weighed 34 gr/1.2 oz out of the box, it comes with the standard bolts and a prop nut, the finish is very nice and it spins very smoothly.
With the prop and other hardware attached ready to go in the plane, it weighs 48 gr/1.7 oz which I think is very good for a 2307 motor, it is right there with all the 2306 size motors I have tested thus far.

I started off the bench testing with the 6x4 APC gas prop, you can read all the test numbers on the motor test spreadsheet which also has links to all the components used in the testing.  The thrust numbers were not that great, but the amps numbers were noticeably low, so I tested with the 6x4 KMP props and finally the Gemfan 6045 carbon nylon prop which is what I will field test it with initially on 3S.

Here are the test numbers for this motor on 3S using the GF 6045 prop and the Turnigy AE-45A ESC with custom settings of 22.5 degrees timing and 24 KHz PWM frequency.

50% throttle - 15.7A/192.3W producing 635 gr/22.4 oz of thrust;

100% throttle - 39.4A/451.3W producing 1200 gr/42.3 oz of thrust.

So I am excited to get to the field and test it, my experience has been that with the GF 6045 CN prop, the bench numbers normally carry over well to the field😊

Park Jet noise...the "other" sound of freedom😎

Cheers,

Scott

Thursday, May 3, 2018

Field test of the EMAX RS2306 2750 kv motor 6x3 EMP prop on 4S - 03 May 2018

Hi Everyone -

Just back from the field ripping some batteries through my red Mig-35B😊
Here is video of one of the flights.  Things happen pretty fast with the extra power, so I might have not been as "chatty" (probably not a bad thing😉) and it was a bit more challenging getting it lined up for some closer passes, but practice will pay off😀


You can read more about the Tattu R-Line 1550 4S 75C batteries I used today at this blog post.

I was pretty impressed with the speed of this plane and how stable it stayed, although since I helped to design and test it, I suppose I'm a bit biased😉

The motor did run pretty warm, but I have certainly felt motors that got a lot warmer and still worked fine.  What really impressed me was how cool the HobbyWing Platinum PRO 40A ESC stayed.  It was warm, but I honestly expected it to be a lot warmer.

In all honesty, I expected it maybe to a bit faster considering it was a 35% increase in thrust over the same prop and motor combo on 3S, but I think the low pitch might have something to do with it.  I suspect when my 5" props show up that have more pitch I might see a bit more speed, but either way, it is very fast and certainly this prop, motor and ESC worked well on 4S.  As I mention in the video, it might take a little patience and discipline to let the motor cool off after a couple of flights on 4S just to keep things running smooth.  

The Tattu 4S batteries had no problem whatsoever delivering the power.  I set my timer for 3 minutes 15 seconds, so the countdown started at about 2:45 and checking the battery shortly after the flight, I was still at around 3.75V per cell which I have learned for long term health is pretty good.  I could probably still safely add about another 15 seconds to the flight in the cooler weather like today (14C/57F), but in the heat of the summer I will probably keep the flights around what I flew today.

So step one of the speed trials is out of the way, I will probably try this out now on my smaller Mig with the 24" wingspan until my "speed build" RC Powers Su-30 V4 is complete.  You can watch more about that project at this playlist on my YouTube channel😀

Park Jet noise...the "other" sound of freedom😎

Cheers,

Scott

Tuesday, May 1, 2018

Tattu R-Line 1550 4S 75C batteries initial impressions and testing

Hi Everyone -

I received a couple of Tattu R-Line 1550 4S 75C batteries in the mail a couple days ago to experiment with some serious speed in my park jets😀

These batteries have a very good reputation from what I have read and watched on YouTube, they were not cheap, but I only bought a couple for some experimentation and serious speed fun!

I went with this small size as I didn't want to pay a big weight penalty, so even though my flights will be short, they should be fast😉  The batteries weigh 186 gr/6.6 oz.  The normal 2200 3S batteries I use weigh 192 gr/6.8 oz, so my planes should still be pretty light to help them be fast. 
I already did some quick testing for a modified RC Powers Su-30 V4 I am building specifically for speed.  Here is a short video I shot discussing this testing.  You can watch more about this special build by going to this playlist on my YouTube channel.
As discussed in the video, the only successful test was with the EMAX RS2306 2750 kv motor using the 6x3 EMP prop and the HobbyWing Platinum PRO 40A ESC with custom settings of 26.25 degrees timing and 8 KHz PWM frequency.  You can see the full details on my motor test spreadsheet, but here are the numbers for the combo I mentioned with this new Tattu 4S battery.

50% throttle - 21.8A/346.5W producing 940 gr/33.2 oz of thrust;

100% throttle - 54.8A/860.2W producing 1630 gr/57.5 oz of thrust.

WOW!  That is a 45% increase in thrust over the best mid range power on 3S and 36% increase at full throttle!😲

Until my 5" props that I have ordered show up, this is the setup I will experiment with.

Here are the 5" props I have ordered based on watching rcplanepirate's video on his testing of the EMAX RS2306 2750 kv motor and his personal recommendations. I pasted this list in from the comments of this video.
Hobby King
HobbyKing 5040 GRP/nylon prop https://hobbyking.com/en_us/glass-fib... Dalprops "Indestructible" Bull Nose 5045 V2 https://hobbyking.com/en_us/dalprop-5... Diatone Bull Nose Plastic Propellers 5 x 4.5 https://hobbyking.com/en_us/diatone-b... Banggood DALPROP 5045 Bullnose PC Propeller https://www.banggood.com/2-Pairs-DALP... Gemfan 5045 5 Inch Propeller Bullnose https://www.banggood.com/4PCS-Bullnos... KINGKONG/LDARC 5040 Propellers https://www.banggood.com/10-Pairs-KIN...

So I am excited to get to the field and start experimenting with these new batteries and this setup in a plane, it is going to be scary fast!😳

Park Jet noise...the "other" sound of freedom😎

Cheers,

Scott